The changing seasons often dictate what delights appear on grocery store shelves, and for many dessert enthusiasts, the beloved peppermint ice cream is a prime example. Typically gracing freezers only during the festive holiday season, its sudden disappearance leaves a year-long void for those who crave its cool, refreshing sweetness. But what if you could bypass the seasonal restrictions and enjoy a divinely creamy, minty treat whenever the craving strikes? Imagine a world where the best homemade peppermint ice cream is always within reach, crafted to perfection right in your own kitchen. This article will guide you through creating your own exquisite batch, ensuring that the magic of peppermint isn't just for December, but for every month of the year.
Why Homemade Peppermint Ice Cream Reigns Supreme
There’s a significant difference between store-bought and homemade ice cream, a distinction that becomes particularly clear when you’re aiming for unparalleled creaminess. Commercial ice creams rely heavily on emulsifiers and stabilizers to achieve their smooth texture and extended shelf life. While convenient, these additives often come at the expense of a truly rich, authentic flavor and mouthfeel.
When you embark on making your own peppermint ice cream recipe from scratch, you gain complete control over the ingredients. This means opting for high-quality dairy, pure extracts, and the exact amount of delightful crunch from crushed candies. The result is not just a dessert, but an experience: a velvety smooth, intensely flavored ice cream that tastes profoundly better than anything you can buy. No more dealing with overly sweet, bland, or icy supermarket versions. This is about indulging in pure, unadulterated minty bliss, custom-made to your preferences.
The Secret to Supreme Creaminess: The Custard Base
The real game-changer for homemade ice cream, especially when you’re aiming for that luxurious, non-icy texture, is the use of a cooked custard base. Unlike simpler "no-churn" recipes that can sometimes yield a icier result, the traditional custard method, often attributed to expert dessert makers, harnesses the power of egg yolks. These yolks are natural emulsifiers, meaning they help to bind fat and water together seamlessly, preventing the formation of large, undesirable ice crystals that make ice cream feel coarse and less satisfying.
This process, while requiring a little more attention, is undoubtedly worth the effort. By gently cooking the egg yolks with milk, cream, sugar, and salt, you create a rich, thick base that, once chilled and churned, transforms into an unbelievably smooth and dense ice cream. It's this cooked custard that provides the structural integrity and opulent mouthfeel that defines truly premium ice cream. Without this crucial step, even the best ingredients can fall short of delivering that divine creaminess we all crave. For a deeper dive into this foundational technique, check out our guide on Crafting Peppermint Ice Cream: The Custard Method for Divine Flavor.
Essential Ingredients for Your Peppermint Masterpiece
Crafting the perfect peppermint ice cream recipe begins with selecting the right components. Each ingredient plays a vital role in achieving that ideal balance of flavor, texture, and creaminess.
- Heavy Whipping Cream and Half-and-Half: This dynamic duo forms the luxurious foundation of your ice cream. Heavy cream provides the high fat content essential for richness and a smooth texture, while half-and-half offers a lighter dairy element that balances the creaminess without making it overly dense. The combination ensures a luscious, full-bodied ice cream.
- Granulated Sugar: Beyond sweetness, sugar contributes to the texture by lowering the freezing point of the mixture, which helps prevent excessive iciness. It also balances the strong mint flavor.
- Salt: A tiny pinch of salt is a flavor enhancer, much like in savory dishes. It brightens the sweetness and brings out the nuances of the mint.
- Large Egg Yolks: These are the heroes of our custard base. As natural emulsifiers, they are crucial for creating a smooth, creamy, and divinely rich texture, significantly reducing the likelihood of icy homemade ice cream.
- Pure Peppermint Extract: This is where the magic minty flavor comes from. Ensure you use a high-quality extract for a clean, refreshing taste. A little goes a long way!
- Pure Vanilla Extract: While peppermint is the star, a touch of vanilla extract rounds out the flavor profile, adding depth and warmth that complements the cool mint beautifully. Don't skip it!
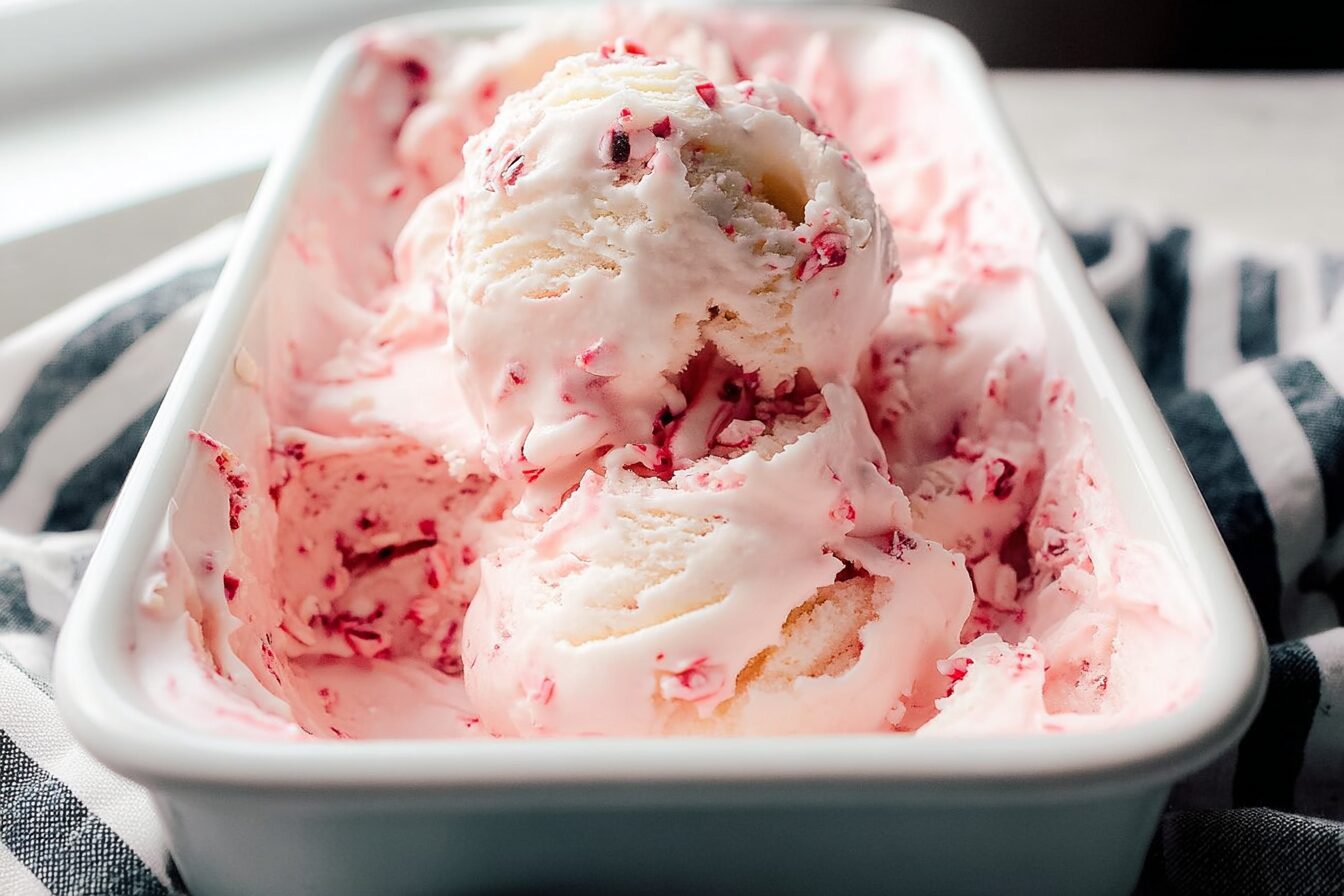
- Crushed Mint Candies or Candy Canes: These provide a delightful textural contrast and an extra burst of minty flavor. Finely crushed candy canes offer a festive look and melt-in-your-mouth crunch. You can use classic red and white candy canes for visual appeal or other mint-flavored hard candies.
Step-by-Step Guide to Crafting Your Peppermint Ice Cream Recipe
Ready to transform simple ingredients into an extraordinary dessert? Follow these detailed steps to create your ultimate peppermint ice cream.
Preparing the Custard Base
- Heat the Dairy: In a large, heavy-bottomed saucepan, combine the half-and-half, granulated sugar, and salt. Heat this mixture over medium-low heat, stirring occasionally, until it reaches approximately 175°F (80°C) and the sugar and salt are completely dissolved. Do not let it boil.
- Temperate the Eggs: In a separate bowl, lightly whisk the egg yolks. Gradually, and slowly, ladle about a cup of the hot half-and-half mixture into the whisked egg yolks, whisking continuously. This crucial step, known as tempering, gently raises the temperature of the egg yolks, preventing them from scrambling when added to the hot liquid.
- Cook the Custard: Pour the tempered egg mixture back into the saucepan with the remaining hot half-and-half. Continue cooking over low heat, stirring constantly with a wooden spoon or spatula, until the mixture thickens enough to coat the back of the spoon. This typically occurs when the temperature reaches 160°F (71°C). Editor's Tip: An instant-read thermometer is your best friend here. Precise temperatures are critical for a perfect custard; overcooking will curdle the eggs, while undercooking won't yield the desired thickness. Immediately remove from heat once it reaches the target temperature.
Cooling and Infusing
- Rapid Cooling: Immediately transfer the hot custard to a large, clean bowl. Place this bowl into a larger pan or bowl filled with ice water (an ice bath). Stir gently and occasionally for about two minutes to rapidly cool the mixture down. This stops the cooking process and preserves the custard's smooth texture.
- Add Creams and Extracts: Once slightly cooled, stir in the heavy whipping cream, vanilla extract, and peppermint extract. Taste and adjust the peppermint extract if you prefer a stronger or milder mint flavor.
- Chill Thoroughly: To prevent a skin from forming and to keep any ice crystals at bay, press a piece of plastic wrap directly onto the surface of the custard. Refrigerate for at least 4 hours, or ideally overnight. A thoroughly chilled base is vital for optimal churning and a creamy end result.
Churning to Perfection
- Prepare Your Ice Cream Maker: Ensure your ice cream maker's freezer bowl is completely frozen (usually requires 12-24 hours in the freezer) or that your machine is otherwise prepped according to the manufacturer's instructions.
- Churn: Transfer the thoroughly chilled custard mixture to your ice cream maker. Churn according to the manufacturer's directions, usually for 20-30 minutes, until the mixture has the consistency of soft-serve ice cream.
- Add Candies: During the last 5 minutes of churning, or immediately after, add your crushed mint candies or candy canes. This ensures they are evenly distributed and retain their crunch.
Storing for Lasting Enjoyment
Homemade ice cream, lacking commercial stabilizers, has a slightly different shelf life and storage requirements than its store-bought counterparts, but with proper care, it remains delicious for days. For more detailed insights on maintaining that perfect texture, refer to our article on Homemade Peppermint Ice Cream: Creamy & Icy-Free Recipe Secrets.
- Prevent Ice Crystals: Transfer the freshly churned ice cream to an airtight container. Before sealing, press a layer of plastic wrap or waxed paper directly onto the surface of the ice cream. This creates a barrier that prevents air from reaching the surface and forming ice crystals, which can lead to iciness.
- Seal Tightly: Secure the lid tightly on your container.
- Deep Freeze: Store the container in the coldest part of your freezer, ideally towards the back, where temperature fluctuations are minimized.
- Enjoy Within a Week: For optimal texture and flavor, aim to consume your homemade peppermint ice cream within about a week. Beyond this, it may start to develop a slightly icier texture, though it will still be perfectly edible.
- Serving Tip: When ready to serve, remove the ice cream from the freezer and let it soften at room temperature for 5-10 minutes. This allows it to reach the perfect scoopable consistency, enhancing its creaminess.
Beyond the Bowl: Creative Ways to Savor Your Peppermint Treat
While a simple scoop of homemade peppermint ice cream in a dish is undeniably satisfying, its vibrant flavor profile makes it incredibly versatile for various desserts. Elevate your enjoyment with these creative serving suggestions:
- Classic with a Drizzle: A generous drizzle of rich chocolate syrup over a scoop of peppermint ice cream is a timeless combination, where the cool mint and decadent chocolate create a harmonious symphony.
- Brownie Bliss: Serve a scoop (or two!) atop a warm, fudgy brownie. The contrast of warm, gooey chocolate and cold, creamy peppermint is an absolute dream.
- Cookie Sandwiches: Sandwich a dollop of your homemade peppermint ice cream between two chewy chocolate Christmas cookies (or any favorite chocolate cookie) for a festive and delicious treat.
- Mint Chocolate Milkshake: Blend a few scoops with milk and an extra dash of peppermint extract for an invigorating and creamy milkshake. Add chocolate syrup for a mint chocolate chip variation.
- Hot Chocolate Float: For a truly indulgent experience, drop a scoop into a mug of steaming hot chocolate. The melting ice cream creates a cool, creamy layer while infusing the drink with minty goodness.
Ditching the limitations of seasonal grocery store offerings means unlocking a world of year-round peppermint pleasure. Crafting your own peppermint ice cream recipe using the time-honored custard method ensures a luxurious, creamy texture and an intense, refreshing flavor that simply cannot be replicated by commercial brands. From the satisfaction of making it yourself to the joy of savoring every perfectly balanced scoop, homemade peppermint ice cream is a culinary delight worth mastering. So, gather your ingredients, fire up your ice cream maker, and prepare to enjoy this cool, creamy sensation any day, any time, year after delightful year.
